Creating professional-looking iPhone photos with Adobe Photoshop is a relatively straightforward process. With just a few simple steps, you can take your photos from bland to beautiful.
The first step is to open the photo in Photoshop. Once the photo is open, you can start making adjustments. One of the most effective ways to enhance a photo is to make subtle adjustments to the brightness and contrast. You can adjust the brightness and contrast levels by navigating to the “Image” tab and clicking “Adjustments”, then selecting “Brightness/Contrast”. Make sure to make small adjustments to the levels, as too much can make the photo look unnatural.
You can also use Photoshop to sharpen the photo. This will make the objects in the photo appear more defined and crisp. To do this, navigate to the “Filter” tab and select “Sharpen”, then adjust the settings as desired.
A great way to give a photo a professional look is to add a vignette. This can be done by selecting the “Vignette” tool, located in the “Filters” tab. From there, you can adjust the intensity and shape of the vignette to your liking.
Finally, you can use Photoshop’s “Clone Stamp” tool to remove any unwanted objects from the photo. This can help create a more professional look.
With just a few easy steps, you can take your iPhone photos from bland to beautiful. With a little practice and patience, you’ll be able to create professional-looking photos with Adobe Photoshop.
Exploring the Latest Photoshop iPhone Features for Enhancing Your Photos
Photoshop is a powerful tool used by millions of people around the world to enhance their photos. With the release of the latest version, Photoshop now offers a variety of features specifically designed for iPhones. These features make it easier than ever for iPhone users to take their photos to the next level.
The first feature worth exploring is the cut-out tool. This tool allows users to select the subject of their photo and remove the background, creating a more professional look. The tool is also great for creating photo collages or masking out certain elements in the photo.
The next feature is the live blend mode. This feature allows users to blend multiple images together in real-time, creating a more dynamic and visually interesting look. Users can also adjust the intensity of the blend, allowing them to create the perfect look for their photos.
The last feature worth exploring is the Photoshop brush tool. This feature allows users to paint and draw directly on their photos, adding a unique touch to their images. The brush tool can be used to create unique effects, add text, or even to make minor edits to the photo.
These are just a few of the features available on the latest version of Photoshop for iPhone. With these tools, users can easily enhance their photos and create unique and eye-catching images. So if you’re an iPhone user looking to take your photos to the next level, be sure to explore the latest Photoshop features for iPhones.
Tackling Common iPhone Photography Mistakes with Photoshop
We all make mistakes when it comes to taking photos with our iPhones. Fortunately, with a bit of help from Photoshop, we can avoid some of the most common pitfalls. In this article, we’ll discuss five common iPhone photography mistakes and how to fix them with Photoshop.
The first mistake is taking photos in low light. Poorly lit photos often come out blurry, grainy, and distorted. To fix this issue, you can use Photoshop’s noise reduction tool to reduce the grainy effect. You can also adjust the levels of brightness and contrast to help bring out details in the image.
The second mistake is taking photos with an overly busy background. A cluttered background can be distracting and take away from the overall impact of the image. To fix this, you can easily use Photoshop’s clone stamp tool to remove unwanted elements. You can also use the crop tool to help focus the attention on the subject of the photo.
The third mistake is taking photos with incorrect exposure. Under- or over-exposed photos can be difficult to salvage. To fix this problem, you can use Photoshop’s curves tool to adjust the levels of brightness and contrast. You can also use the shadows and highlights tool to bring out details in the image.
The fourth mistake is taking photos with incorrect white balance. When the white balance is off, the colors in the image can appear unnatural. To fix this issue, you can use Photoshop’s white balance tool to adjust the color temperature of the photo.
The fifth mistake is taking photos with too much digital noise. Digital noise is the result of taking photos in low light or with a high ISO. To reduce noise, you can use Photoshop’s noise reduction tool to smooth out the image.
By avoiding these common iPhone photography mistakes and using Photoshop to fix them, you can create professional-looking photos. With just a few clicks, you can take your photos from amateur to professional.
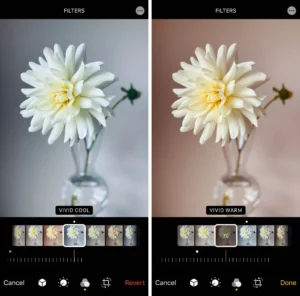
Tips for Applying Photoshop Filters to iPhone Photos for Maximum Impact
1. Before Applying Any Filters, Adjust the Image’s Exposure Settings: Before applying any filters to your iPhone photo, make sure to adjust the exposure settings. This will help to ensure that the filter will have the maximum impact on your image. If the exposure settings are too low, the filter will not be as noticeable.
2. Choose the Best Filter for the Image: Different filters can have different effects on your image. For example, a black-and-white filter can add a classic, timeless look to your photo, while a vintage filter can create an old-fashioned effect. Think about the effect that you want to achieve and then choose the best filter for your image.
3. Apply the Filter in Smaller Increments: Instead of applying the full strength of the filter to your image, try applying it in smaller increments. This will help to ensure that the filter doesn’t overpower the image.
4. Adjust the Filter Settings: After applying the filter, you can also adjust the settings in order to achieve the desired effect. Experiment with different settings until you get the look that you are going for.
5. Make Final Adjustments: After you have applied the filter and adjusted the settings, make any final adjustments to the image in order to achieve the maximum impact. If the filter is too strong, you can reduce the intensity or brightness of the image.
Following these tips will help you to apply Photoshop filters to your iPhone photos for maximum impact. With a little bit of experimentation, you can create stunning images that will be sure to stand out.